Objective : 

   1. Setting for headless mode (No monitor, mouse, keyboard) - remote access via TightVNCServer

   2. Minimal attachment to the board : power, webcam and network cable (switch to wifi dongle later).

   3. GPIO setting for motor control

   4. Serial communication with ESP32 (ESP32 will handle Lidar, A/D, DAC)


===========================================================

1. Download server image from Odroid wiki site.

2. For now, you cannot use SSH log-in.  So, attach monitor, keyboard, mouse.

3. After login, 

sudo passwd root
  (enter default password "odroid" for sudo)
  (for new password, "111" and confirm) - enter extremely easy password.  Save yourself from password hell.
  
sudo passwd odroid
  (same thing.  change all password to "111")

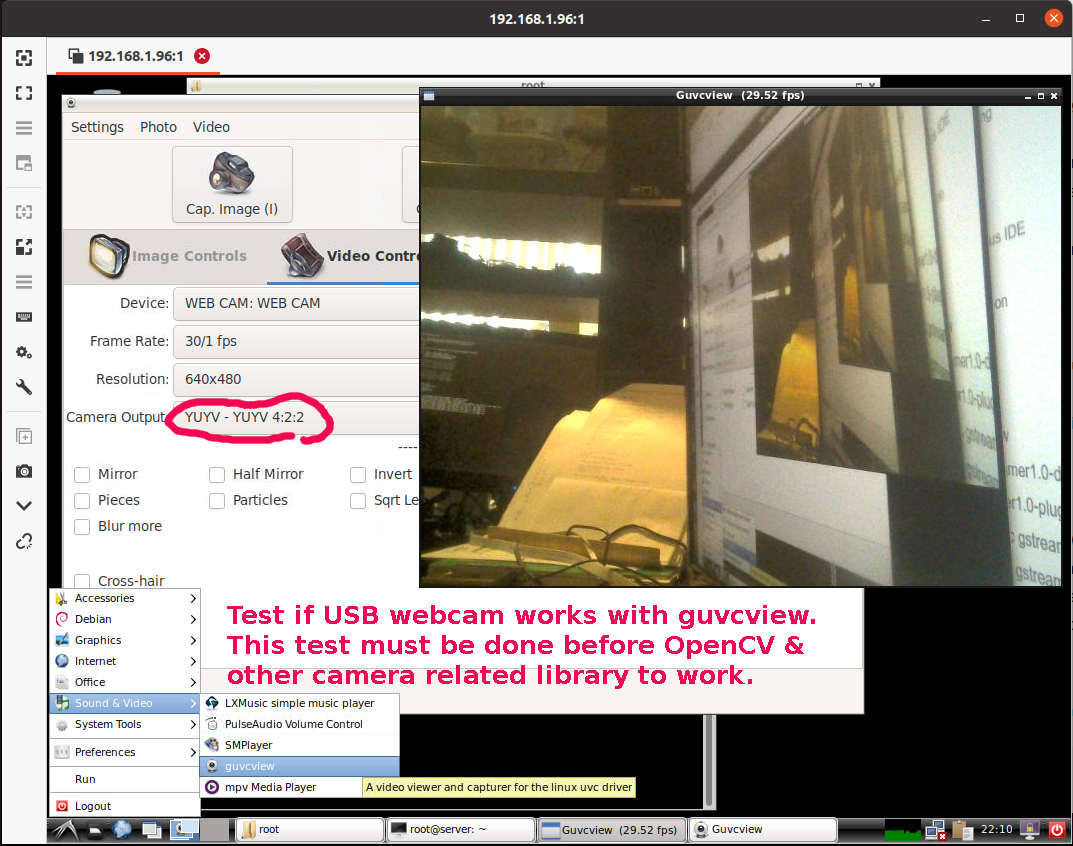
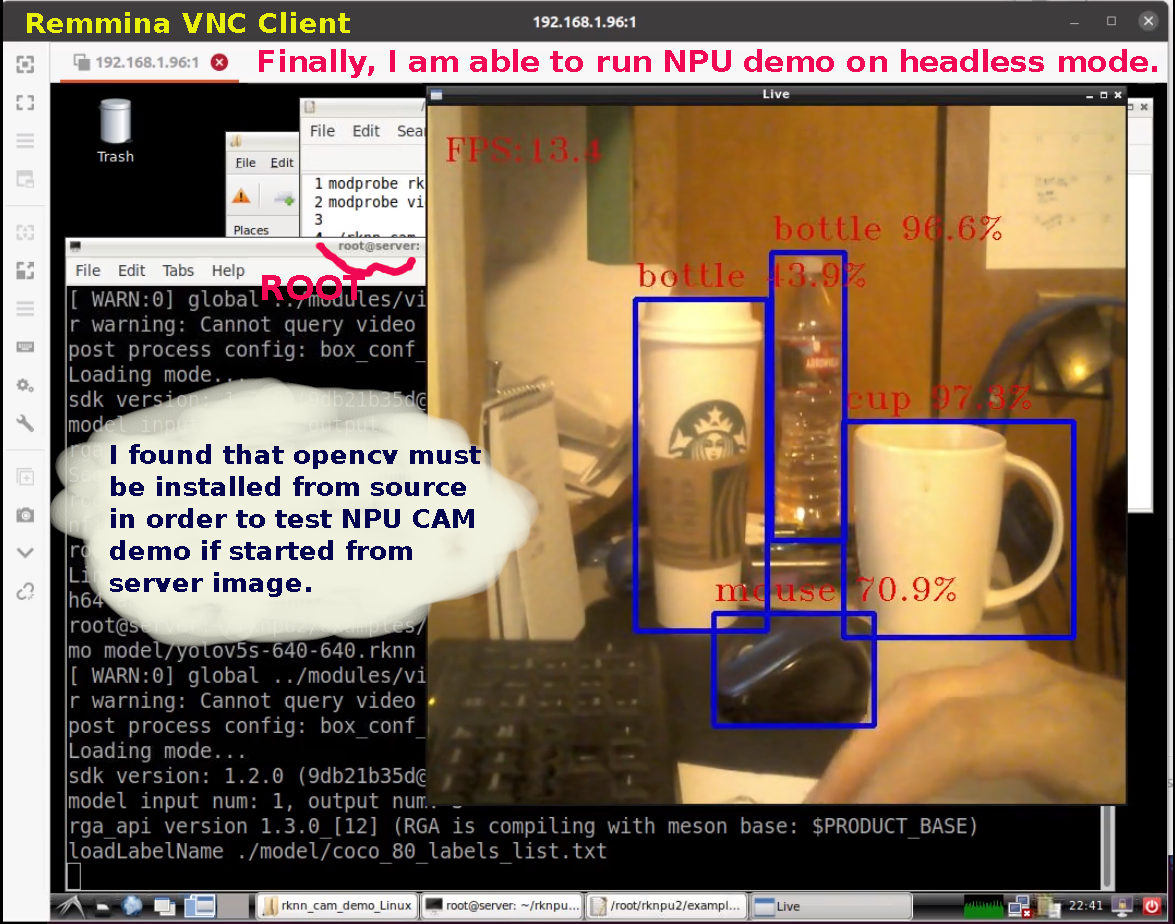
// This steps are needed for NPU to work
sudo apt update
sudo apt upgrade

sudo apt-get install nano

sudo nano /etc/ssh/sshd_config
// Allow enable SSH login option, so "root" can be remotely log-in
# Authentication:
#LoginGraceTime 2m
PermitRootLogin yes   (<== change right here)
#StrictModes yes
#MaxAuthTries 6
#MaxSessions 10

sudo reboot

// After reboot, make sure to log-in as root via SSH.  
// The user id "odroid" will not be used anymore.

// ************  IP RESERVATION with Router *************

// Try to reserve IP address for Odroid-M1 on your home or office router's configuration.

// If this device's MAC address is reserved with fixed local IP address, then this device will always have

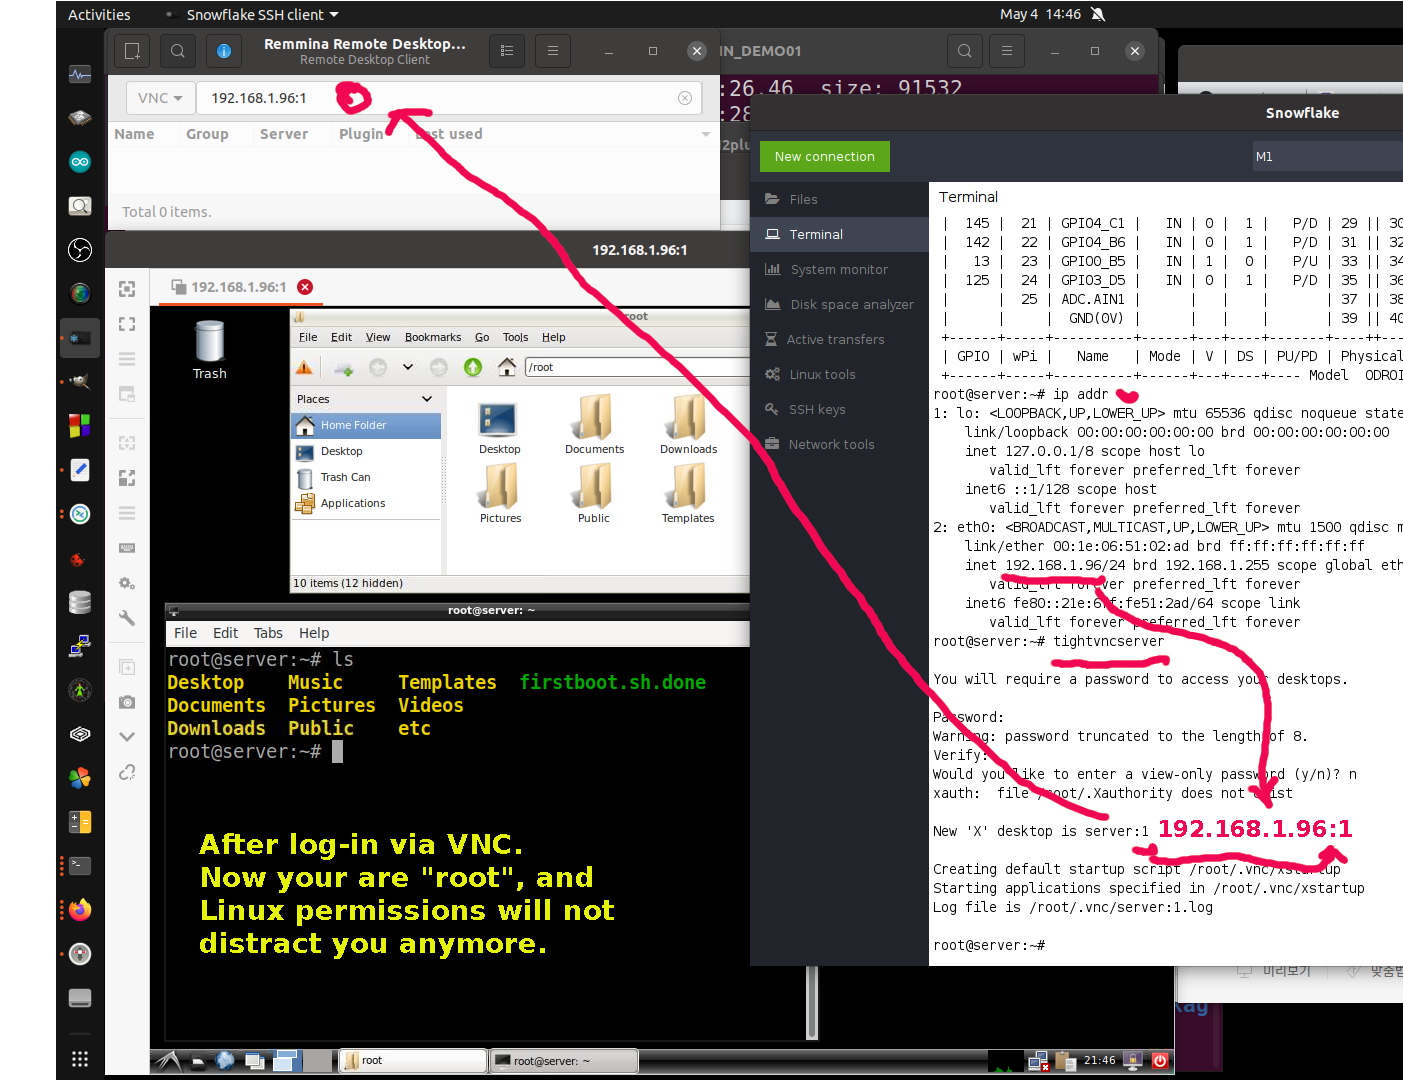
// same local IP address everytime it boot-up.   In my case, I have set its IP to 192.168.1.96


// now log-in from PC using SSH as root, 111  (My case, I use Snowflake on Ubuntu.  With Snowflake, you can have file manager between PC & bot, text editor that can edit files on bot from PC, and endless number of terminals.)

// Install LXDE 

apt-get install lxde

  - during setting, it will as for gdm or lightdm, choose lightdm.

apt-get install libx11-dev libgtk2.0-dev libcairo2-dev libpango1.0-dev libxtst-dev libgdk-pixbuf2.0-dev libatk1.0-dev libghc-x11-dev
apt-get install xorg tango-icon-theme gnome-icon-theme


// Install Tight VNC Server

apt-get install tightvncserver thunar-volman udisks2 gvfs


// For NPU programming

apt install g++

apt install cmake


// Pre-install For Lazarus IDE

apt install gdb

apt-get install subversion


// For Webcam

apt-get install v4l-utils

apt-get install guvcview

apt-get install libgstreamer1.0-dev libgstreamer-plugins-base1.0-dev libgstreamer-plugins-bad1.0-dev gstreamer1.0-plugins-base gstreamer1.0-plugins-good gstreamer1.0-plugins-bad gstreamer1.0-plugins-ugly gstreamer1.0-libav gstreamer1.0-doc gstreamer1.0-tools gstreamer1.0-x gstreamer1.0-alsa gstreamer1.0-gl gstreamer1.0-gtk3 gstreamer1.0-qt5 gstreamer1.0-pulseaudio


// For general programming

apt-get install -y git


// For general monitoring

apt-get install htop


// GPIO library : How to download wiringOP
apt install odroid-wiringpi
apt install wiringpi-examples
gpio readall
gpio readall -a


// Disable auto hibernate.   It is extremely annoying if it keeps on hibernating and never wakes up.

systemctl mask sleep.target suspend.target hibernate.target hybrid-sleep.target


ip addr   <== to find out the local IP address of  Odroid-M1.  In my case, I have fixed its IP to 192.168.1.96 at router.


// Remote Log-in via VNC with Remmina Remote Desktop

tightvncserver

  - then it will ask for vnc remote password two times.   Enter "111" for simplicity

  - Would you like to enter a view-only password (y/n)?  <= Important.  You don't want view-only.


// Using Remmina from Ubuntu PC, log-in with VNC with the local IP address + ":1" at the end.

// Once you log-in via VNC, then now, you are READY! to run it in headless mode and develop Robot.

VNC remote log-in


I love this style, similar to old Windows 95.&nbsp; &nbsp; Perform USB webcam test with guvcview

===============================================================

NPU CAM demo (I have done it with UBS webcam.)

For this demo, you will have to follow the instruction from wiki site's RKNPU  project.

Important : If server image is used instead of desktop image, OpenCV must be installed from source in order to make this demo work.   

Otherwise, ./build-linux.sh step will terminate with error.

Refer this site for installing OpenCV from source - (Method 2) :  vitux.com/opencv_ubuntu/


좋은 출처 : https://www.electronicwings.com/raspberry-pi/mpu6050-accelerometergyroscope-interfacing-with-raspberry-pi


MPU6050 (Accelerometer+Gyroscope) Interfacing with Raspberry Pi |..

MPU6050 is a combination of 3-axis Gyroscope, 3-axis Accelerometer and Temperature sensor with on-board Digital Motion Processor (DMP). It is used in mobile devices, motion enabled games, 3D mice, Gesture (motion command) technology etc.

www.electronicwings.com

MPU6050 Code for Raspberry Pi using Python 

'''
        Read Gyro and Accelerometer by Interfacing Raspberry Pi with MPU6050 using Python
	http://www.electronicwings.com
'''
import smbus				#import SMBus module of I2C
from time import sleep        #import

#some MPU6050 Registers and their Address
PWR_MGMT_1   = 0x6B
SMPLRT_DIV   = 0x19
CONFIG       = 0x1A
GYRO_CONFIG  = 0x1B
INT_ENABLE   = 0x38
ACCEL_XOUT_H = 0x3B
ACCEL_YOUT_H = 0x3D
ACCEL_ZOUT_H = 0x3F
GYRO_XOUT_H  = 0x43
GYRO_YOUT_H  = 0x45
GYRO_ZOUT_H  = 0x47


def MPU_Init():
	#write to sample rate register
	bus.write_byte_data(Device_Address, SMPLRT_DIV, 7)
	
	#Write to power management register
	bus.write_byte_data(Device_Address, PWR_MGMT_1, 1)
	
	#Write to Configuration register
	bus.write_byte_data(Device_Address, CONFIG, 0)
	
	#Write to Gyro configuration register
	bus.write_byte_data(Device_Address, GYRO_CONFIG, 24)
	
	#Write to interrupt enable register
	bus.write_byte_data(Device_Address, INT_ENABLE, 1)

def read_raw_data(addr):
	#Accelero and Gyro value are 16-bit
        high = bus.read_byte_data(Device_Address, addr)
        low = bus.read_byte_data(Device_Address, addr+1)
    
        #concatenate higher and lower value
        value = ((high << 8) | low)
        
        #to get signed value from mpu6050
        if(value > 32768):
                value = value - 65536
        return value


bus = smbus.SMBus(5) 	# or bus = smbus.SMBus(0) for older version boards
Device_Address = 0x68   # MPU6050 device address

MPU_Init()

print (" Reading Data of Gyroscope and Accelerometer")

while True:
	
	#Read Accelerometer raw value
	acc_x = read_raw_data(ACCEL_XOUT_H)
	acc_y = read_raw_data(ACCEL_YOUT_H)
	acc_z = read_raw_data(ACCEL_ZOUT_H)
	
	#Read Gyroscope raw value
	gyro_x = read_raw_data(GYRO_XOUT_H)
	gyro_y = read_raw_data(GYRO_YOUT_H)
	gyro_z = read_raw_data(GYRO_ZOUT_H)
	
	#Full scale range +/- 250 degree/C as per sensitivity scale factor
	Ax = acc_x/16384.0
	Ay = acc_y/16384.0
	Az = acc_z/16384.0
	
	Gx = gyro_x/131.0
	Gy = gyro_y/131.0
	Gz = gyro_z/131.0
	

	print ("Gx=%.2f" %Gx, u'\u00b0'+ "/s", "\tGy=%.2f" %Gy, u'\u00b0'+ "/s", "\tGz=%.2f" %Gz, u'\u00b0'+ "/s", "\tAx=%.2f g" %Ax, "\tAy=%.2f g" %Ay, "\tAz=%.2f g" %Az) 	
	sleep(1)

Code 실행 결과 

 Reading Data of Gyroscope and Accelerometer
Gx=0.00 °/s     Gy=0.00 °/s     Gz=0.00 °/s     Ax=0.00 g       Ay=0.00 g       Az=0.00 g
Gx=-0.25 °/s    Gy=-0.05 °/s    Gz=-0.04 °/s    Ax=-0.18 g      Ay=0.56 g       Az=0.72 g
Gx=-0.28 °/s    Gy=-0.10 °/s    Gz=-0.02 °/s    Ax=-0.17 g      Ay=0.56 g       Az=0.74 g
Gx=21.01 °/s    Gy=-46.73 °/s   Gz=-66.13 °/s   Ax=-0.60 g      Ay=0.53 g       Az=1.98 g
Gx=-1.12 °/s    Gy=0.08 °/s     Gz=-2.44 °/s    Ax=0.91 g       Ay=0.25 g       Az=-0.42 g
Gx=-20.89 °/s   Gy=22.92 °/s    Gz=-12.68 °/s   Ax=0.57 g       Ay=0.91 g       Az=-0.08 g
Gx=-8.25 °/s    Gy=6.10 °/s     Gz=-2.79 °/s    Ax=-0.14 g      Ay=-0.28 g      Az=0.79 g
Gx=0.19 °/s     Gy=-1.33 °/s    Gz=0.41 °/s     Ax=-0.27 g      Ay=-0.19 g      Az=0.89 g
Gx=-1.12 °/s    Gy=0.74 °/s     Gz=-1.82 °/s    Ax=0.01 g       Ay=-0.03 g      Az=0.93 g
Gx=-16.98 °/s   Gy=-8.69 °/s    Gz=-0.35 °/s    Ax=0.53 g       Ay=0.11 g       Az=0.41 g
Gx=-0.86 °/s    Gy=-3.69 °/s    Gz=-3.56 °/s    Ax=0.41 g       Ay=-0.85 g      Az=1.86 g
Gx=8.50 °/s     Gy=-13.91 °/s   Gz=-2.17 °/s    Ax=1.00 g       Ay=0.22 g       Az=-0.11 g
Gx=1.95 °/s     Gy=-15.69 °/s   Gz=-6.44 °/s    Ax=0.88 g       Ay=0.49 g       Az=0.22 g
Gx=-0.90 °/s    Gy=-19.22 °/s   Gz=4.11 °/s     Ax=0.79 g       Ay=0.20 g       Az=0.20 g
Gx=2.63 °/s     Gy=-0.53 °/s    Gz=3.50 °/s     Ax=0.57 g       Ay=0.22 g       Az=0.47 g
Gx=7.98 °/s     Gy=-5.44 °/s    Gz=-4.53 °/s    Ax=0.16 g       Ay=-0.44 g      Az=1.19 g
Gx=-1.49 °/s    Gy=2.40 °/s     Gz=-1.51 °/s    Ax=0.50 g       Ay=-0.40 g      Az=0.69 g
Gx=9.06 °/s     Gy=-0.34 °/s    Gz=11.00 °/s    Ax=-0.20 g      Ay=-0.04 g      Az=0.61 g
Gx=8.08 °/s     Gy=-0.40 °/s    Gz=-2.18 °/s    Ax=-0.12 g      Ay=0.08 g       Az=0.93 g
Gx=-0.26 °/s    Gy=-0.06 °/s    Gz=-0.07 °/s    Ax=-0.04 g      Ay=0.12 g       Az=0.94 g
Gx=-0.23 °/s    Gy=-0.02 °/s    Gz=-0.08 °/s    Ax=-0.04 g      Ay=0.12 g       Az=0.94 g
Gx=-0.25 °/s    Gy=-0.08 °/s    Gz=-0.09 °/s    Ax=-0.06 g      Ay=0.15 g       Az=0.93 g
Gx=-0.23 °/s    Gy=-0.05 °/s    Gz=-0.03 °/s    Ax=-0.06 g      Ay=0.17 g       Az=0.93 g
Gx=-0.29 °/s    Gy=-0.06 °/s    Gz=-0.05 °/s    Ax=-0.07 g      Ay=0.15 g       Az=0.92 g
Gx=-0.40 °/s    Gy=0.06 °/s     Gz=-0.11 °/s    Ax=-0.07 g      Ay=0.16 g       Az=0.94 g
Gx=-0.28 °/s    Gy=-0.04 °/s    Gz=-0.08 °/s    Ax=-0.08 g      Ay=0.17 g       Az=0.93 g
Gx=-0.25 °/s    Gy=-0.07 °/s    Gz=-0.04 °/s    Ax=-0.06 g      Ay=0.14 g       Az=0.94 g
Gx=-0.27 °/s    Gy=-0.05 °/s    Gz=-0.02 °/s    Ax=-0.06 g      Ay=0.16 g       Az=0.93 g
Gx=6.27 °/s     Gy=8.89 °/s     Gz=2.79 °/s     Ax=0.06 g       Ay=-0.07 g      Az=0.90 g
Gx=4.08 °/s     Gy=36.98 °/s    Gz=-14.33 °/s   Ax=0.28 g       Ay=0.08 g       Az=0.66 g
Gx=-2.27 °/s    Gy=-2.36 °/s    Gz=-1.52 °/s    Ax=-0.13 g      Ay=0.01 g       Az=0.95 g
Gx=0.41 °/s     Gy=-0.18 °/s    Gz=-0.15 °/s    Ax=-0.09 g      Ay=0.30 g       Az=0.89 g
^CTraceback (most recent call last):
  File "/root/o/2.py", line 82, in <module>
    sleep(1)


+ Recent posts